

2021 Cargo Connect Robot Design
Design
Our robot is named Dummy. Dummy is built using the Spike prime hub and has two large motors for driving, two medium motors for attachments, two-color sensors for line following, and a built-in gyro. This is our second year using Spike Prime.
Mechanical
We spend a lot of time testing and iterating our attachments.
When we start designing an attachment, we use our attachment library to decide what movement is needed. Our attachment library is a variety of simple machines made both digitally in a CAD design software called Studio and physical models of LEGO.
On the cart, we can iterate attachments to achieve the function we need. Once our attachment is ready for the robot, our design and programming teams work together to iterate the attachment to do the mission.
We improve our attachments with a process called “Kaizen”, which we learned from Toyota, which means continuous improvement.
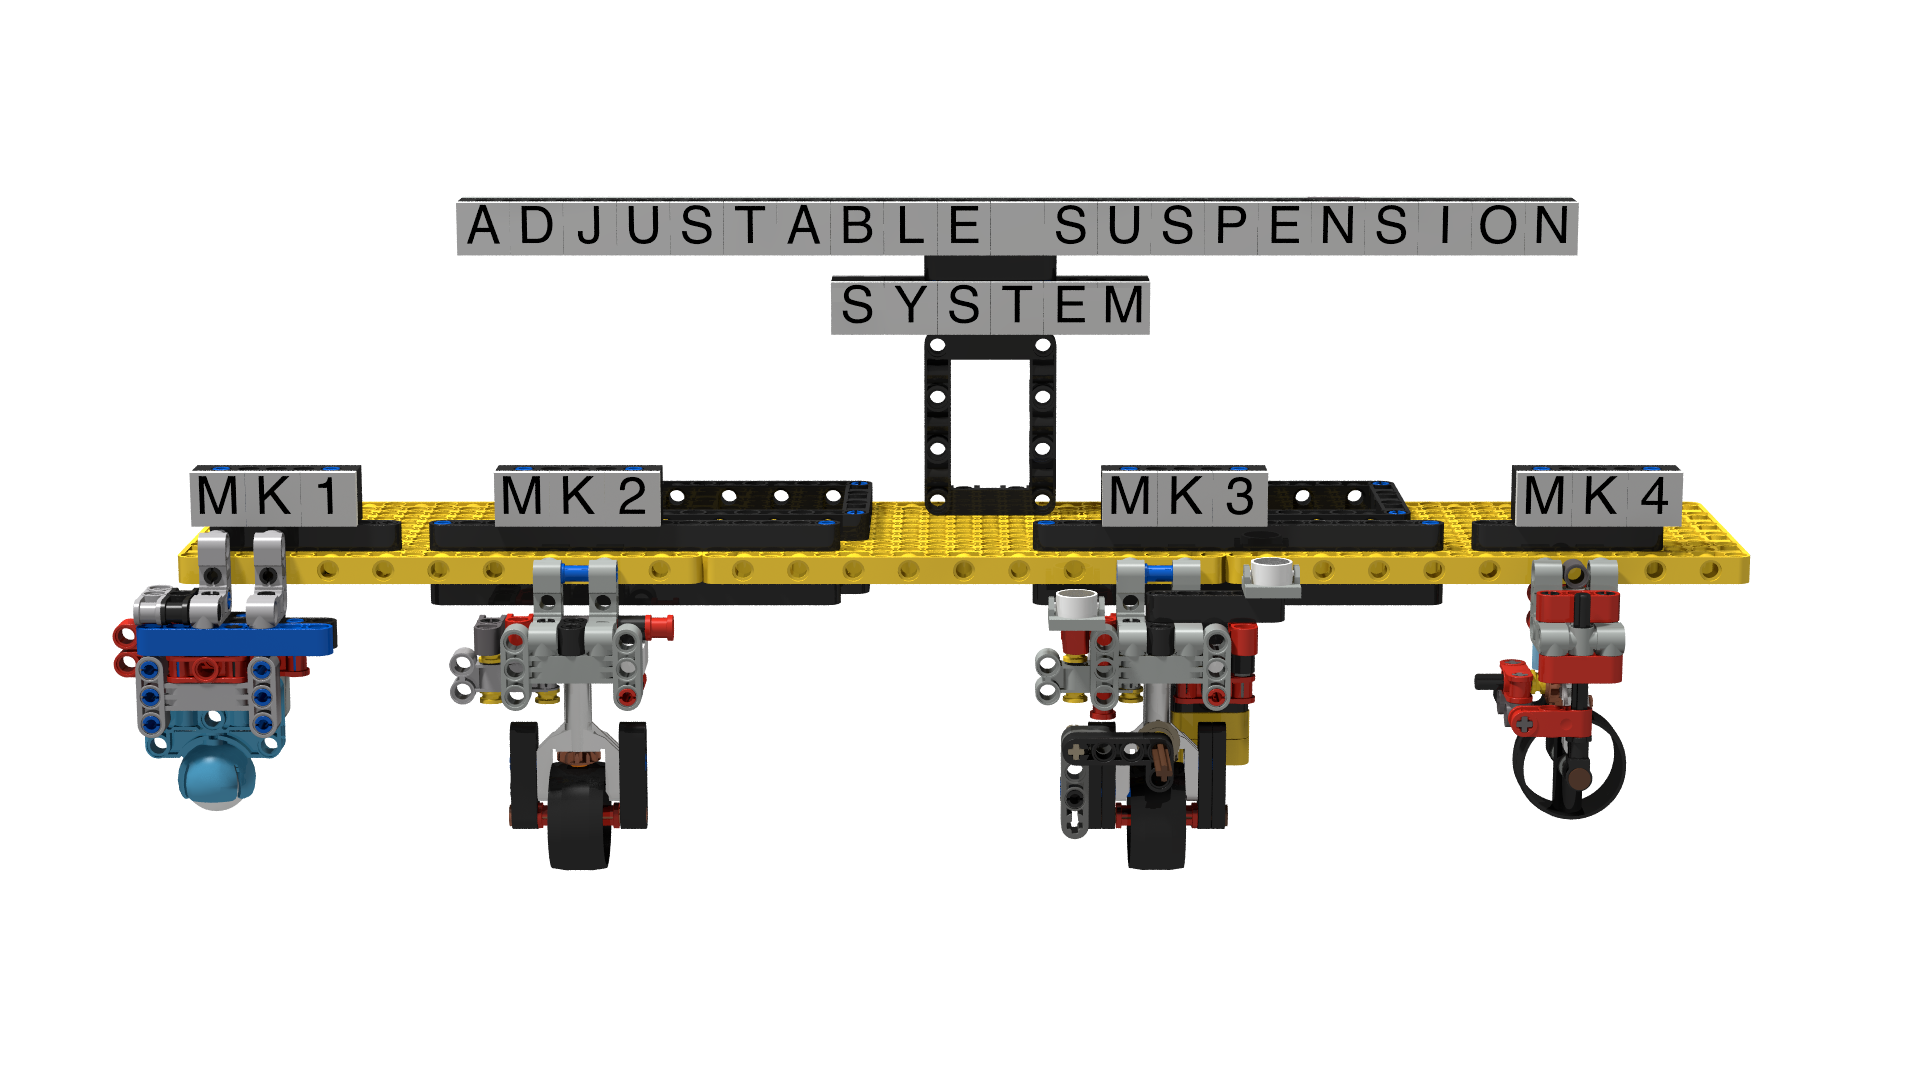
One example of how we used Kaizen is the Adjustable Suspension System.
Every time we tested different wheels, we had to change out the rear suspension to keep the robot level. We fixed this problem by making our suspension system adjustable.

On the second iteration, Mark 2, we discovered that when the robot ran, it vibrated. Which made the linear actuator wiggle and adjust up and down.

On the third iteration, Mark 3, we added a locking gear to eliminate the wiggle movement.

With our latest design, Mark 4, we finalized and streamlined the design making it smaller and more efficient to change.

Programming
We programmed in Python this year and used global functions to make our coding quick and easy to do adjustments with variables. We have functions for distance, gyro driving straight, color sensor line following and, gyro turns right and left.
We use comments to document our mission plan, which helps us know what to do next. All off this is documented in our engineering notebook.
With Covid last year we learned we needed to improve our code versioning and be able to work apart. We started using “GitHub” which has been a lifesaver.
Strategy

Our goal is to maximize our point value on the table.
To complete our goal, our Strategy consists of five steps:
First, together, we go over all the rules and create mission planning sheets.
Second, our build team uses our attachment library to identify the base attachment. They design and test it with our cart. The cart is a replica of our robot base without drive motors so it is easy to move around the table and lets us test without using the robot.
Third, we have our programing team plan out the robot’s mission path using the mission planning sheets. Mission planning sheets use measurements we get from our tape measure and a digital protractor.
Fourth, the programming team calculates how much time we have to complete the mission. The time required is based on distance and mission order.
Fifth, we all look at ways to combine missions.
After this, our robot is ready to program. This strategy impacts our table performance and by applying it to the robot we score over 520 points.

Engineering Notebook
We’ve learned that our most practical and time-saving item is our engineering notebook.
In the notebook, we list what we did in each meeting, our next actions, and assignments for the team. We document what works and doesn’t work in all of our testings so we don’t repeat our mistakes.
Last year, we made it completely digital using Microsoft OneNote. This way, everyone can see the progress made and what we still have to do. This season we used both a physical book and digital documentation. With 7 of us on the team, we wanted everyone to have access to it and, we wanted a physical copy to reflect on.
Innovative Ideas
We love to color code.
Our wires and motors are color-coded to make things as easy as possible. This makes it easier to switch things out like motors and sensors needed for a mission.
One of our most innovative ideas is our attachment system. Our attachments are connected to our robot by magnets.
Using The 2Xstream Robotics Design Process
Over the years, we discovered that we have to plan and strategize as a team to be successful. We spent 3 months of our season building our foundation by strategizing, expanding the attachment library, and perfecting our function library.
We shared these ideas and files with each other using Microsoft Teams messaging and file sharing app.
IDENTIFYING THE PROBLEM
IMAGINING A SOLUTION
CREATING A DESIGN
TESTING OUR IDEAS
USING KAIZEN TO ITERATE
AND MOST IMPORTANTLY SHARING OUR IDEAS WITH THE WORLD THROUGH OUR YOUTUBE CHANNEL AND WEBSITE 2XSTREAMROBOTICS.NET

This is the 2Xstream Robotics Design Process.
2020 RePlay Robot Design
Design
While retaining our original compact design, we also managed to make it smaller. Our robot uses the spike prime hub, motors and sensors, which are significantly smaller than the EV3. Our robot has two large motors we use for driving, two medium motors, three color sensors, and one distance sensor.
Below is a interactive 3D model of Riptide MK1
Mechanical
One of our most intricate mechanisms is our attachments and attachment system. our attachments are connected to our robot using magnets which mean gravity is not an issue. Our attachments are designed to get the most done and the shortest amount of time, while also helping our robot to be more efficient.
Below is a AR model of Riptide MK1

Programming
Our robot is programed in python. We choose to use this because we wanted and challenge.
Strategy
Our Strategy consist of five steps:
We go over all the rules and create mission planning sheets. Our goal is to do every mission. Though that might seem like a stretch, if we don’t try every mission first: some missions that look harder can be easy, and some that look easy can be harder.
We look through our attachment library and figure out what type of attachment to use for each mission
We have the programing team plan out a way to get to the area of the mission using the mission planning sheets we designed.
We calculate how much time we have to complete the mission.
We look at ways to combined missions together.
2019 City Shaper Robot Design
2018 Into Orbit Robot Design
2017 Robot Design
Design
The Robot is built with as few parts as possible. Side rails are used to protect the wheel, align the robot and place attachments on it. As a rookie team we wanted to have a simple design that works.

2017 Robot Hydro Dynamics
Strategy
Run simple programs that work most of the time. Keep the robot as close to the base as possible to save time. It is not how many parts we put on the robot but the least amount of parts we can put on it and get it to work right.
Programming
Master program is a loop program that runs till a button is pressed.
A button press runs 1 of 5 “my block” programs for each of the 5 missions.
The 6th mission program is run from the menu.
Mechanical
Wedge Attachment is used to lift.
Arm Attachment is used for 2 missions to move objects.
Blade and Dump Attachment is used for 3 missions to push and dump objects. The pins are removed to tilt and dump payloads.